Getting Started with Azure App Service
App Service is a Platform as a Service (PaaS) provided by Azure that allows developers to deploy their web applications without worrying about the underlying infrastructure. By freeing the developers from infrastructure management, the developers can focus on adding features to their applications.
Azure provides two tenancy types at two levels regarding your application’s deployment environment: Networking level and Computing level.
At the networking level, the network boundary your applications are running in can be shared with other App Service customers (multi tenancy) in an Azure-managed virtual network. Your applications can also be deployed in a virtual network that you managed (single tenancy). We find the same tenancy types at the computing level as well. The multi tenancy type runs your applications on virtual machines shared with other applications belonging to other App Service customers. App Service also provides the capability of running your application on dedicated virtual machines.
Under the hoods, App Service deploys a farm of servers (Windows or Linux) that host your applications with a load balancer to balance traffic between web app instances.
On top of the compute power, App Service provides additional features that streamline the developer experience. The available features depends on the type App Service plan purchased. The following features are available:
- Authentication on top of your application without modifying the application
- Horizontal scaling by adding more VMs
- Vertical scaling
- By choosing a bigger or smaller VM size in the same plan
- By choosing a more powerful or less powerful VM in another plan
- CI/CD integration with popular source code management systems
- High availability with multi-zone deployment
- Global static assets deployment using Azure CDN
- Custom domains and TLS certificates
- Deployment slots that enable multiple deployment strategies
How does it work ?⌗
How do you set App Service ?⌗
The first step in setting up Azure App Service is to select and create an App Service plan. The following plans are available:
- Free
- Shared (supported for Windows only)
- Basic
- Standard
- PremiumV2
- PremiumV3
- Isolated
- IsolatedV2
App Service supports two operating systems: Windows and Linux. App Service plans pricing depend on the selected operating system and virtual machine sizes. Each plan provides multiple compute sizes to choose from. Please refer to the App Service pricing for more information on compute sizes available and their pricing. Please note that listed prices are per individual virtual machines (aka workers) deployed.
The following command creates a free App Service plan using with the Linux Operating system
az appservice plan create --resource-group rg-blog-playground --name as-getting-started-free --sku Free --is-linux

How do you deploy a web app ?⌗
Once the underlying compute power is available, it’s time to bring up the application.
Deploying our application is a two-step process:
- Create the web app resource and its configuration
- Deploy your application code
Azure App Service supports the following languages and runtimes:
- Node.js
- Python
- Golang
- .NET Core
- ASP.NET
- Java
- Linux Container (Custom containers are supported)
- Windows Containers
How do you create and configure a web app ?⌗
The App Service plan created the underlying infrastructure needed to run the developer’s applications. It this the first step in deploying a web application on App Service.
The next step is to deploy a web app resource. The following command creates a web app stub using the Azure CLI:
az webapp create --name gs-node-app --plan as-getting-started-free --resource-group rg-blog-playground --runtime NODE:20-lts

After your application is deployed, you may need to change the runtime version (e.g. from Node.js 18 to 20), set some environment variables required for your web app to work.
Azure App provides constructs that enable web app configuration:
- General settings, used to set stack settings (runtime, major and minor versions,…), platform settings (HTTP version, HTTPS redirect, …), and debugging settings.
- Application settings, used to set values passed as environment variables to the web app at startup.
- Connection strings, used to set database connection strings.
Notes:
- Application settings and connection string values override values passed via a configuration file
- For runtimes other than ASP.NET and .NET Core, it is preferable to use application settings to set connection strings
App Service is natively integrated with Azure Key Vault and App Configuration. Azure Key Vault is the recommended storage service for secret values like database password, connection strings, API keys, and so on. Azure App Configuration on the other hand is a service that provides a single management pane for application configuration values. For your web apps to interact with Azure Key Vault and App Configuration, they must be associated with an identity with the required permissions to be authenticated by Entra Id and provided authorization to access their target key vaults and App Configuration stores. That identity is called managed-system identity.
The following command sets ENV and REGION environment variables via application settings:
az webapp config appsettings set -g rg-blog-playground --name gs-node-app --settings ENV=DEV REGION=FRC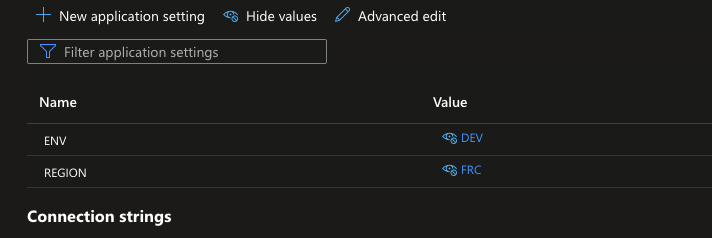
How do you deploy your application’s source code ?⌗
App Service runs applications in two ways:
- Directly on the provisioned virtual machines, the default for Windows.
- In containers running on the provisioned virtual machines, default for Linux.
App Service allows developers to provide their own container image.
Behind the scenes, App Service mounts a content share (a network file share via Azure Files ) at /home/site/wwwroot for Linux or D:\home\site\wwwroot for Windows, to make your applications’ content available on the virtual machine or the web app container. The same file share is mounted in all virtual machines hosting your application. At the end, deploying your application bowls down to updating the files in the content share. If your applications are deploying via custom containers, deploying a new version of your applications amounts to creating a new docker image and updating your web app to pick the most recent image.
App Service provides two ways to update your applications’ contents:
- Kudu; a deployment tool supports multiple deployment types: war, jar, ear, lib, startup, static, zip.
- FTP(S); each web app exposes two FTP endpoints (
read-onlyandread-write).
All available deployment methods use one of the deployment mechanisms above. The following deployment methods are available:
- GitHub, BitBucket, and Azure DevOps continuous deployment integration
- Local git; a remote git server that triggers a new deploy on a push to the default branch (
masterby default) - File deployment (zip, war, jar, …) using the CLI or Kudu API endpoint.
App Service integration with GitHub creates a GitHub workflow that automates application deployment using a GitHub Action. Azure pipeline provides as well a task that deploys an App Service web app.
Zip file deployment supposes that the everything required for the app to run. As the zip file size is limited to 2 GB, it may best for Node.js apps, to build the web app on the virtual machine. To enable build automation for zip deploy, you must set SCM_DO_BUILD_DURING_DEPLOYMENT app setting to true.
The following command zips the root directory of a sample Node.js app
zip -r sample-app.zip .
Then I deploy the zip file using the Azure CLI
az webapp deploy -g rg-blog-playground --name gs-node-app --src-path sample-app.zip

Any change made to the application files forces a restart of the application. In a production environment, this means a downtime for users. To avoid this downtime, App Service provides deployment slots.
A deployment slot is a staging environment with its own configuration, deployed on the same infrastructure. Deployment slots don’t incur additional cost but contributes to the overall usage of the compute power. A deployment slot can be used to validate changes prior to going live in production. Deployment slot swapping enables a seamless replacement of the production environment with the staging environment. App Service enable traffic splitting between two slots. This help validate changes on the staging slot before swapping it with the production slot.
How does App Service integrates with other Azure services ?⌗
Your application may need to access resources available on another Azure services. The way App Service interacts with other Azure services depends on the kind of authentication mechanism the other Azure service supports.
For an application that needs to access a PostgreSQL database deployed on an Azure PotgreSQL instance, the application needs a user/password credential to connect to the target database. In this case, you must set your credentials either as a database connection string or an App Setting. The best practice is to store your database credentials (and any other secret e.g. certificates, api keys, …) in Azure Key Vault and reference the secrets in the key vault via an app setting configuration.
Azure Key Vault is the kind of service that doesn’t support user/password authentication mechanism. For your application to access secrets stored in Azure Key Vault, it must have the required access permissions via a managed service identity (MSI)`. You assign a role with the required access to the managed identity attached to your web app.
Closing words⌗
On the preceding lines, we’ve introduce the Azure App Service as a PaaS service that deploys HTTP-based applications like mobile backend, web applications, and APIs. I talked about the basic concepts required to run an application and the deployment steps of an application and how to configure it.
The isolated plans (Isolated and IsolateV2) require an App Service Environment. App Service Environment provides the capability of deploying the underlying resources in a customer-managed virtual network.
A good practice when working with App Service is to use separate plans per environment (production, nonproduction). In a non production environment, depending on your requirements and policy, select lower tier plan to save cost. Leverage Always On platform setting (disabled by default) to stop idle app and save compute power that can be used by other web apps. Always On setting must be enabled in production.
Also in production environment, you’ll want to deploy your web apps across multiple availability zones for high availability. Zone-redundant deployment is enabled from PremiumV2 plan upward. At least three virtual machines instances are created across three availability zones.